
The need for spiritual comfort is at its greatest after the death of a loved one. If you, or someone you know, has suffered a tragic loss, you should consider making a rosary.
You don’t need to be talented with crafts in order to make a rosary.
All you need are our 16 steps for how to make a rosary from flowers (like rose petals), which includes the BEST video that you will find online.
We also show you how to make rosary beads from dried flowers. (And we include another awesome video!)
You could make rosary beads from funeral flowers, sympathy flowers, from the petals of your loved one’s favourite flower, or from grass or leaves that grow in a place that was special to him or her.
Alternatively, you could use store-bought beads to make a rosary. Choose colours and designs that remind you of your loved one.
With any choice you make with respect to beads, the rosary is sure to become a treasured and often used keepsake.
What is a Rosary?
The rosary is a form of prayer used by parishioners, especially in the Catholic Church. It is named for the string of prayer beads used to count the component prayers. A person saying prayers moves his or her fingers along the beads as each component prayer is recited.
Rosary beads serve a practical purpose. They help people keep track of where they are in the prayer sequence. Because they are tactile, they also help parishioners emotionally connect with the prayers being recited.
Overview of How to Make Rosary Beads From Dried Flowers
The first step in making rosaries from flowers is to make your own beads that incorporate dried flowers into the wet clay. Again, you can use dried funeral flowers or petal or leaves from a favourite plant.
To make a rosary, you will first need to make 53 rosary beads using dried flowers.
Below is a video that shows you exactly how to make rosary beads from flowers. (These floral beads will later be attached together to form your rosary.)
The video is followed by detailed, written instructions—so don’t worry if you missed something in the video—we’ve got you covered.
So without further ado, let’s get started…
Materials and Tools for Making Rosary Beads From Flowers
You need only a few materials and tools for this flower bead-making project:
- Dried flowers: Any kind of flower is suitable. For example, you can use roses, carnations or lilies, which are popular sympathy and funeral flowers. You could also incorporate your loved one’s favourite flower. (For example, if your Nana loved pink roses, incorporate pink rose petals into the clay.) For our funeral flower beads, we used red carnation petals. If your loved one was male, and flowers are too ‘girly’, you could incorporate dried grass or leaves from a place that holds special memories.
- Sculpey Polymer Clay: Sculpey Polymer Clay can be purchased at most craft stores and comes in a large variety of colours. Consider the colour of your dried funeral flowers when selecting clay colours to work with. Dark coloured petals will be more easily seen in a light coloured clay, and vise versa.
- Four thick pieces of wire: You can purchase wire at the hardware store, or cut a wire coat-hanger with a pair of pliers and use the long piece at the bottom of the triangle. The wire should be longer than the length of your baking pan, as the wire will be suspended over the baking pan during the process of baking the funeral flower beads. You should only put a maximum of 15 beads on 1 piece of wire in order to prevent the beads from fusing together while baking.
- Baking pan.
- Sharp knife.
- Ruler.
Instructions for How to Make Rosary Beads From Flowers
Step 1: Make Dried Flower Petals
You can let sympathy and funeral flowers dry naturally by leaving them in a vase without any water. However, this method may take several weeks, depending on the weather and level of humidity in the air.
If you don’t wish to wait several weeks for your flowers to completely dry, use our ‘Quick Dry’ Method instead.
The first step in the ‘Quick Dry’ Method is to gently pull the petals from the base of the stem. It is fine if they are crushed during the process as the petals, once they are fully dried, will need to be further crushed before they are incorporated into the polymer clay.
Next, preheat the oven at its lowest temperature, which is about 180 degrees Fahrenheit or 82 degrees Celsius in most conventional ovens.
Then line a cookie sheet with parchment paper. Arrange the petals from your sympathy and funeral flowers in a single layer on the parchment paper. If the petals are crowded, they will not fully dry.
Finally, place the cookie sheet with your funeral flower petals into the oven and heat.
Small petals from flowers like carnations will take approximately 7 minutes until they are completely dry, while large petals (e.g. rose petals) will take approximately 15 minutes or longer.
Check the petals regularly to see how they are drying.
You should leave the oven door cracked open so that moisture can escape during the drying process.
Step 2: Form the Beads Made From Flowers
The first thing you need to do is to preheat the oven to the temperature specified on the polymer clay package. Temperatures vary by brand.
Next, crush a handful of dried flower petals into tiny pieces.
Once you are satisfied with the size of your dried flower petals, break off approximately 3 tablespoons of polymer clay. This amount will produce approximately 63 beads with a diameter of 0.5 cm.
(Remember, you need 53 funeral flower beads to make your rosary. Our instructions are for more than you need in case a few of them are misshapen.)
Now get the polymer clay ready to use by working and kneading it in your hands vigorously. (Imagine that you are working with pizza dough.) Once the clay is soft and pliable, you are ready to shape it.
Roll the polymer clay into a long tube with a diameter of approximately 0.5 cm.
Lay the polymer clay tube next to a long ruler and then notch the clay in 1 cm increments. Then cut a 1 cm segment of polymer clay using a sharp knife.
Roll the polymer clay into a ball. Then flatten it out with the palm of your hand. Once the clay resembles a flat and round pizza base, sprinkle a pinch of the dried and crushed funeral flowers evenly over the top.
Once you are satisfied with the amount of dried funeral flowers and the evenness of its distribution over the top of the flat polymer clay, knead the clay in your hands. The goal is to work the dried funeral flowers into the clay.
Once you have the dried petals worked into the clay, shape the clay into a bead. The bead can be a sphere, a cube, a flat disc, tubular, or any other shape that you like.
After you have shaped a bead, check again if you like the amount of dried flower flecks in the clay. If you are unsatisfied, you can add more, but be sure to rework the clay so that the flower petals that you added are fully incorporated into clay before you reshape the bead.
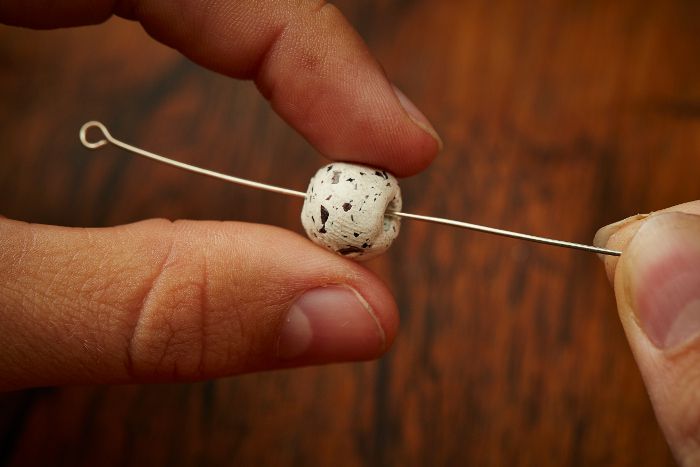
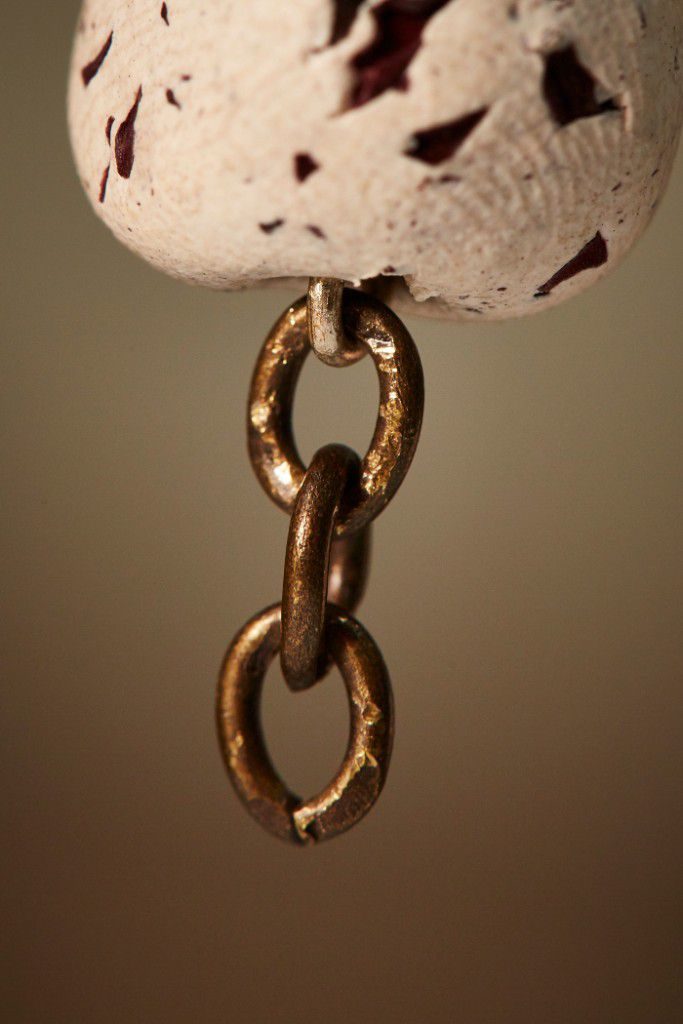
Once you are happy with the shape of your first bead, pierce a hole through the centre of the bead with your wire. Leave the funeral flower bead on the wire (see photograph below):
Prop the wire across your baking pan so that your bead is suspended on the wire and not touching the bottom of the pan. Doing this will prevent your bead from forming a flat side during the baking process.
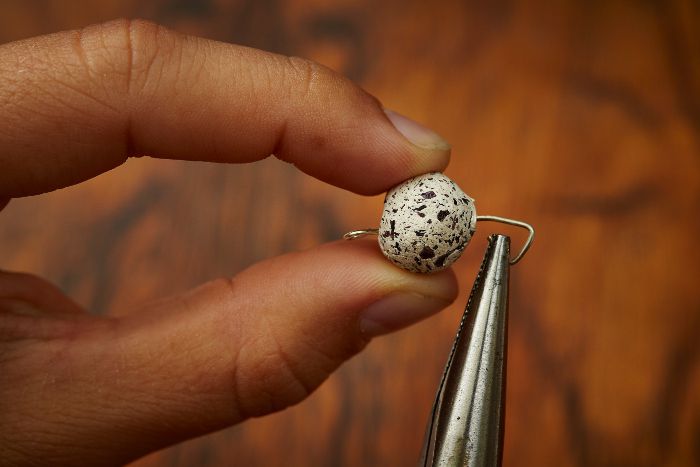
The bead will probably loose some of its shape when you thread it onto the wire, so gently reshape the bead with your fingers. Do not tug on the bead as you are doing this, as you will make the hole in the centre of the bead too large.
Next, form more beads. Besides the shape, you can also experiment with making different sizes of beads.
If you don’t like a bead that you have made, simply rework the polymer clay until you are happy with how it looks. It really is like working with Play-Doh!
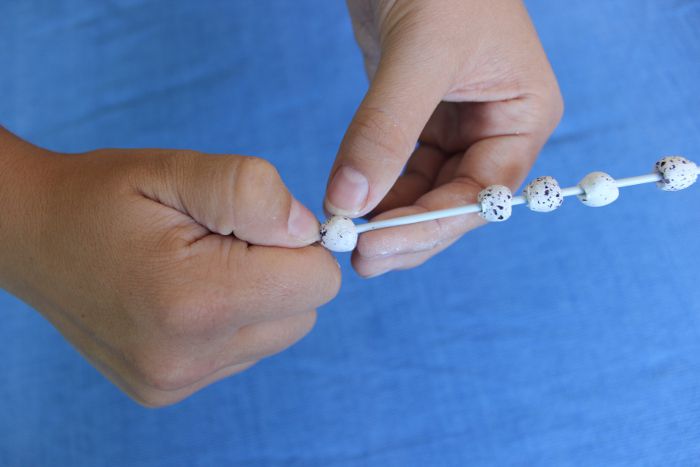
After each individual bead is made, feed the beads onto the wire, leaving space between the beads. If you fail to leave space, the funeral flower beads will fuse together during the baking process
Place the baking pan with the suspended funeral flower beads into your preheated oven and set the timer according to the directions given on the polymer clay packaging.
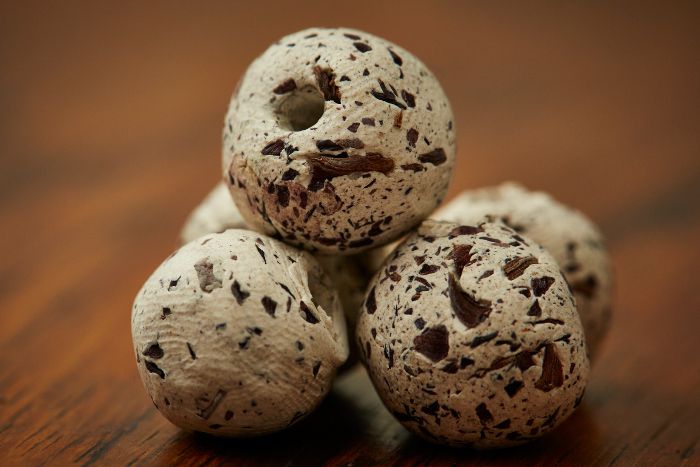
Once the funeral flower beads have been baked, let them cool for about 25 minutes. When the beads and the wire are cold to the touch, carefully remove the beads from the wire.
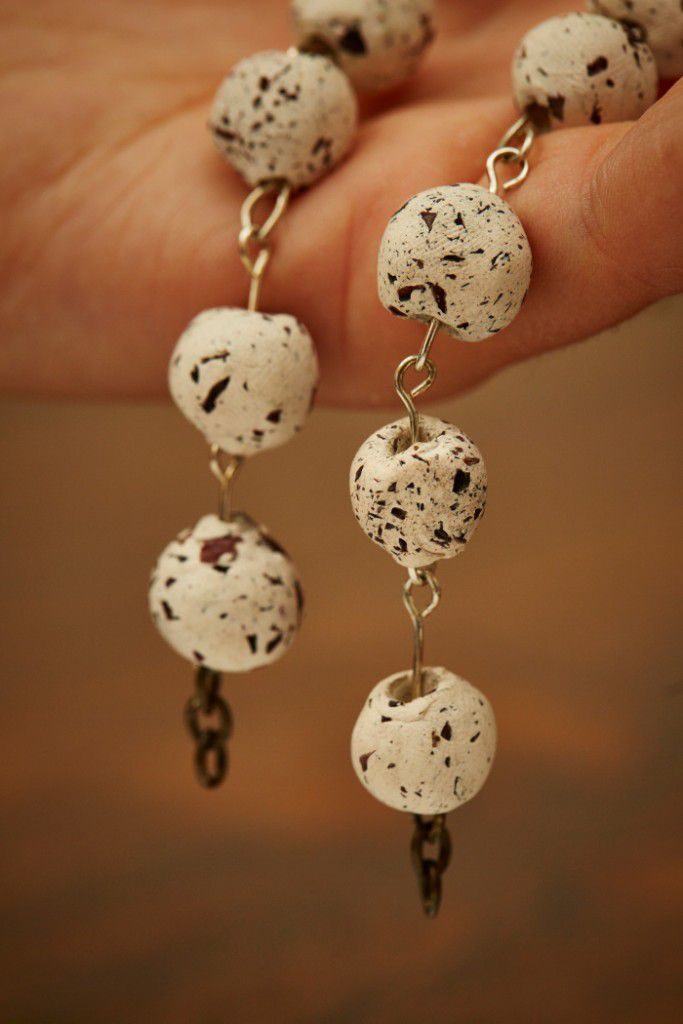
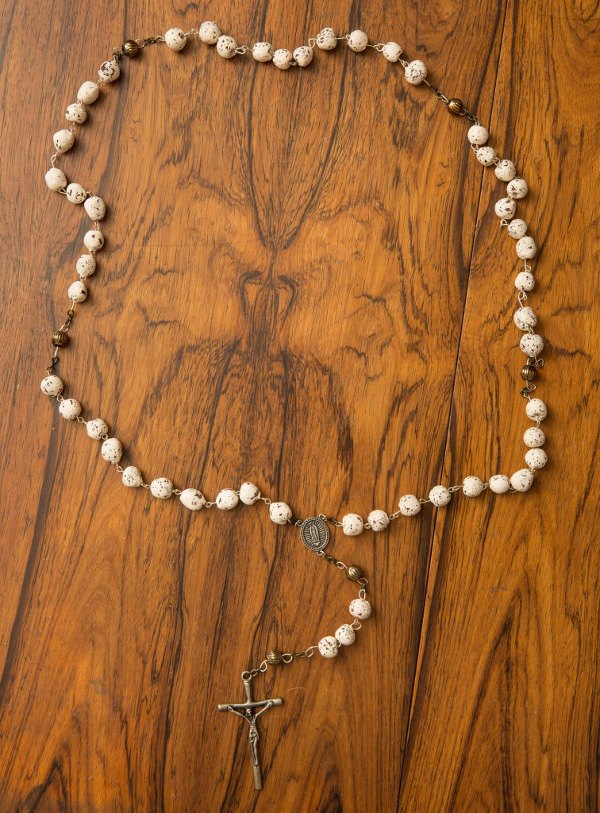
Your baked beads made from flowers should look something like ours:
How to Assemble Your Rosary Once You Have the Rosary Beads
Now that you have at least 53 beads made from funeral or sympathy flowers, or 53 store-bought beads, you are ready to start working on assembling your rosary.
Below is a video that shows you exactly how to make a rosary using your funeral flower beads. (Again, the video is followed by detailed, written instructions and close-up photographs in case you need to refresh your memory.)
Materials and Tools for Assembling Your Rosary
You will need the following materials and tools to make a rosary from dried flowers:
- 53 funeral flower beads.
- 6 plain beads (i.e. beads not made from funeral flowers).
- 59 eye pins: The size of the eye pin must correspond to the size of the hole through the bead. Make sure the loop at the top of the eye pin is bigger than the hole in your beads so that the eye pin stays in place. If your 53 funeral flower beads are a different size to your 6 plain beads, even by 1 millimeter, you will need 2 different sizes of eye pins.
- Jewellery chain: Buy either a 1 (8-inch) jewellery chain that you will cut into small sections OR 14 (3-links) jewellery chains that don’t require cutting.
- 1 centrepiece.
- 1 crucifix.
- 3 or 4 small jump rings: Please note that you will need 4 jump rings if your crucifix does not have a jump ring built into it.
- Round-nose pliers.
- Flat-nose pliers.
- Wire cutters.
The Anatomy of a Rosary
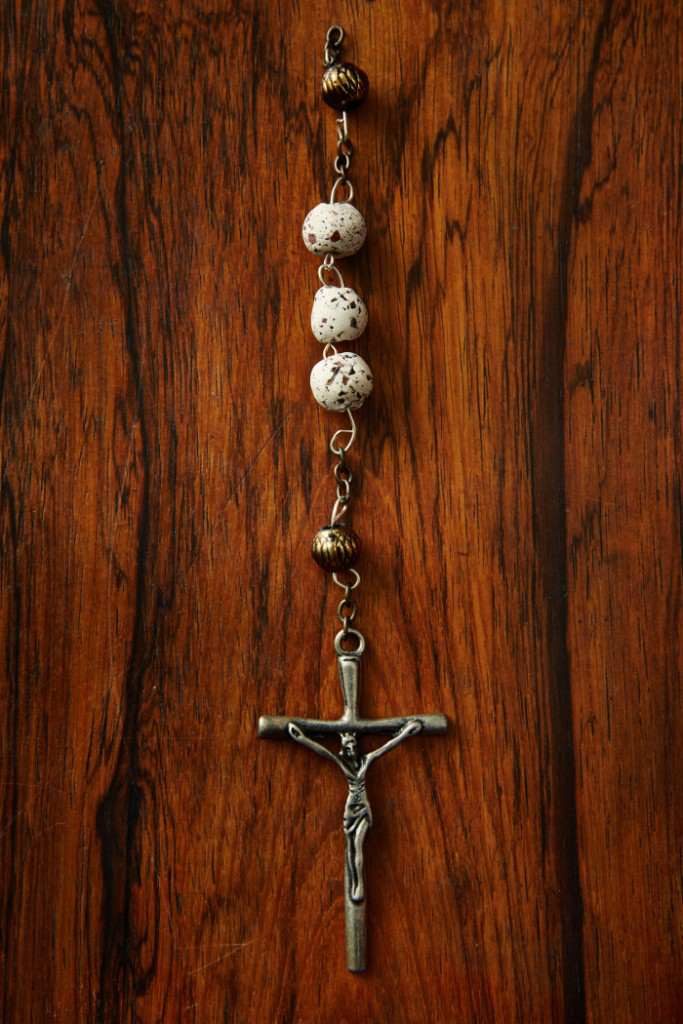
If you understand the anatomy of a rosary, it will be easier to follow our instructions for creating rosaries from flowers.

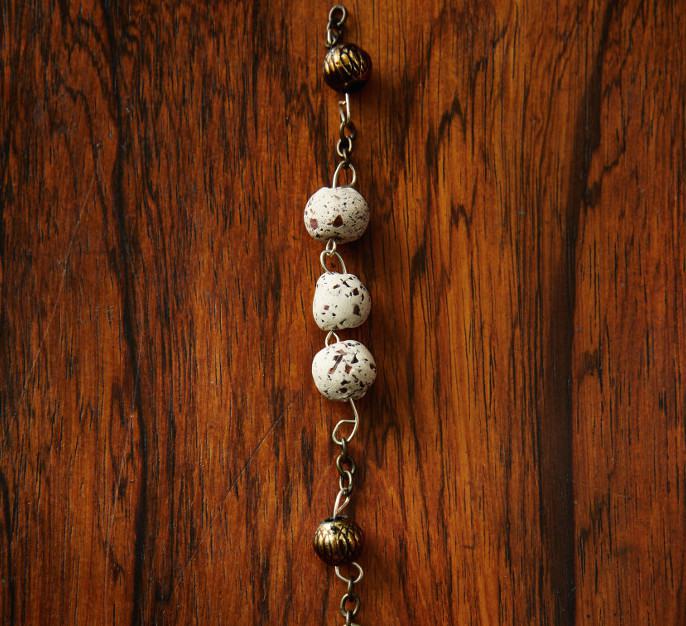
If you study the photograph above, starting from the bottom, the anatomy of a rosary is as follows:
- The crucifix (a crucifix refers to a cross with Jesus present)
- A length of dangling beads. (It includes 1 set of 3 Hail Marys. Each Hail Mary is one white funeral flower bead.)
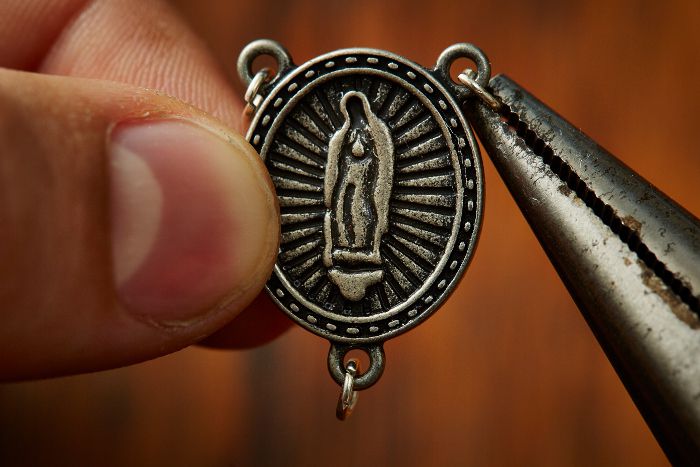
- The centrepiece. (This is the round object that looks like a penny. It has three connection points on it.)
- The decade. (This is the largest part of the rosary. It includes 5 sets of Hail Marys. Each set has 10 white funeral flower beads. In essence, the decade is a big closed loop.)
Steps for Getting Prepped to Make a Floral Rosary
STEP 1: Mount Rosary Beads Onto Eye Pins
The first thing you are going to do is mount each of your 59 rosary beads onto an eye pin. As stated above, it is important to use the right size eye pin for the size of the bead hole you are using.
STEP 2: Curl the Straight End of the Eye Pin and Form a Loop
Eye pins have one end already formed into a loop, so you only have to form the other end.
Using your round-nose pliers, curl the straight end of your eye pin around until you form another loop. (Your loop should be the same size as the loop that came with the eye pin.) You might need to cut off some of the excess wire to form the loop and you can do this using your wire cutters.
Be careful of the amount of pressure you apply when curling the loop, as you don’t want to dent the eye pin.
The end result you want is to have a bead with a loop on either side of it. The loops should be twisted 90 degrees towards each other.
At the end of this step, you should have 59 beads with 2 loops on each bead.
WARNING: This step is finicky and takes a lot of time and patience. However, having a unique rosary made from dried flowers at the end of the craft makes it worth the effort.
STEP 3: Attach the Funeral Flower Beads Within Each Set Together
You have 53 funeral flower beads. Group them together as follows:
- 5 sets of 10 funeral flower beads; and
- 1 set of 3 funeral flower beads
You also have 6 plain beads (i.e. beads not made from funeral flowers) that should be kept in a separate pile.
You are now ready to attach all the funeral flowers beads within a set to each other via the eye pin loops.
To do this step, you need to carefully use your round-nose pliers to open one loop of the eye pin on a bead (which we will refer to as “Bead A”).
You then want to take another bead (“Bead B”) and slip one of its loops through the open eye pin loop of Bead A.
Then, using your round-nose pliers, reclose the loop on Bead A, making sure the metal ends of the loop are touching without any space left in-between.
Repeat this method for all the beads within the set.
At the end of this step, you should have 5 individual sets of 10 attached beads and 1 individual set of 3 beads.
WARNING: Do not join the 6 plain beads together.
STEP 4: Cut the Jewellery Chain
If you purchased an 8-inch length of jewellery chain, you will have to cut every fourth link with your wire cutters.
When you have finished cutting the jewellery chain, you should have 14 pieces of chain (with each piece being 3-links long).
Obviously, if you bought pre-cut jewellery chain, you can skip this step.
STEP 5: Attach Jewellery Chain to the 6 Plain Rosary Beads
Take your 6 plain rosary beads (i.e. the beads not made from dried flowers) and open the loops at each end of the eye pin.
TIP: It is best to do one end at a time so that your rosary beads don’t fall off the eye pin.
You then attach a 3-link chain to each side of the plain rosary bead. You do this by sliding the last link of the chain through the open loop. Close the loop again using your flat or round-nose pliers until the metal edges are touching each other.
Repeat this method for all of your plain rosary beads.
At the end of this step, you should have 6 plain rosary beads with a 3-link chain on both sides of the bead. (You should also have 2 pieces of 3-link chain remaining, which you will use in the next step.)

STEP 6: Attach Jewellery Chain to 2 Sets of 10 Rosary Beads
Take 1 set of 10 floral rosary beads and attach 1 piece of 3-link chain to one end. (Further on in these instructions, we will refer to this finished portion as “Decade 1”.)
Take another set of 10 floral rosary beads and attach 1 piece of 3-link chain to one end. (Further on in these instructions, we will refer to this finished portion as “Decade 2”.)
After this step is completed, you should have 2 sets of 10 rosary beads that have a piece of 3-link chain attached to one end (Decade 1 and Decade 2).
STEP 7: Attach Jump Rings to the Rosary’s Centrepiece
Take a jump ring and open it with your flat-nose pliers.
Then put the opened jump ring through one of the holes in the centerpiece and reclose the jump ring using your pliers.
Repeat this process with the remaining 2 jump rings and holes in the centerpiece.
Steps For Making the Decade
STEP 1: Attach Decade 1 to the Top Jump Ring of the Centrepiece
Take Decade 1 and attach the end of the chain to the top jump ring on the centerpiece using your pliers.
Place the attached string of beads on the right-hand side.
STEP 2: Attach Decade 2 to the Top Jump Ring of the Centrepiece
Take Decade 2 and attach the end of the chain to the top jump ring on the centerpiece using your pliers.
Place the attached string of beads on the left-hand side.

STEP 3: Attach the 3 Remaining Sets of 10 Floral Beads (Along With 4 Plain Beads)
If you study the photograph of the sample rosary we made, you will notice that there is a pattern in the decade: 1 set of 10 floral beads, followed by 1 plain bead, another set of 10 floral beads, followed by another plain bead, and so on.
At this stage of the craft you should have 3 sets of 10 flower beads left. Following this pattern, attach these 3 remaining sets, with a plain bead in-between each set.
The last step here is to link the two sides of the rosary together so that it forms one big, closed loop. Now your decade has been completed.

Steps for Attaching the Dangling Set of Beads With the Crucifix to the Centrepiece
STEP 1: Attach 1 Plain Bead to the Bottom Jump Ring of the Centrepiece
Take 1 plain bead with its 2 chains. Open 1 chain link on the plain bead and attach it to the jump link at the bottom of the centerpiece.
STEP 2: Attach the 1 Set of 3 Flower Beads
After the step above is done, one loop of the plain bead is attached to the centrepiece, while the other loop is unattached.
Using your pliers, open up the unattached end and attach your only set of three funeral flower beads. Again, be gentle with the pliers when closing the loop.
STEP 3: Attach 1 Plain Bead
Attach 1 plain bead to the bottom end of the set of 3 funeral flower beads. Again, always make sure that you properly reclose the eye pin.
STEP 4: Attach the Crucifix to the Rosary
Now it is time for the last step, which is attaching the crucifix to the rosary.
Open the chain link at the free end of the plain bead you just attached and slip the jump ring of the crucifix into the chain link.
Using your pliers, re-close the chain link so that the metal edges are touching tightly.
And there you have it, a completed rosary made from funeral flower beads.
What to do with Left-Over Funeral Flower Beads?
If you have left-over funeral flower beads after making your floral rosary, consider turning them into a charm bracelet. This is a very simple project to do with our easy-to-follow instructions and video tutorial.
With your left-over funeral flower beads, you could have a beautiful memorial charm bracelet that looks like this:


Related Articles


Share Your Unique Floral Rosary With Us
We hope that you liked our video, along with our step-by-step instructions, on how to make a rosary from flowers.
If you used funeral or sympathy flowers for this project, the rosary will be a reminder — long after the flowers have faded — of how one’s community of friends and family rallied around you during one of the most difficult times of your life.
On the other hand, if you made the rosary from the petals of your loved one’s favourite flower — like rose petals — your rosary is sure to become a treasured memento of him or her.
Please tell us about the rosary that you made. What type of flowers did you use? What colour clay? We would love to see a photograph of your creation, along with a description of the person that you loved and lost.
We, along with our readers, look forward to hearing from you.
Don’t forget to follow us on Pinterest for more memorial craft ideas!