
If you have lost someone that you cared about deeply, make a beautiful charm bracelet that you can wear every day to remember him or her by.
We show you how to make a charm bracelet with our easy-to-follow written instructions. We also have an instructional video to ensure that your charm bracelet is gorgeous.
When it comes to the beads for your charm bracelet, you can use any type of bead that you like.
However, consider making your own beads for your charm bracelet using polymer clay. It’s very simple to do, we promise.
If you choose to make your own beads, we suggest that you incorporate flower petals into the clay to make your charm bracelet extra special.
You can use flower petals from your loved one’s favourite flowers. For example, if she loved roses, you could incorporate rose petals into the clay before baking the beads. Alternatively, you could incorporate dried funeral flowers.
If the person that passed away was male, and it seems ‘too girly’ to incorporate dried flower petals into the clay, you could incorporate dried grass or leaves from an outdoor location was was special to you both.
Let’s get started and make a charm bracelet that’s sure to become a treasured keepsake…
How to Make Beads From Flowers
If you choose to use beads made from flowers, you will need to read this section. (If you are using store-bought beads, skip forward to the instructions on how to make a charm bracelet.)
Below is a video that shows you exactly how to make beads from flowers. The video is followed by detailed, written instructions—so don’t worry if you missed something in the video—we’ve got you covered.
What You’ll Need For Beads Made From Flowers
You need only a few materials and tools to make your own beads using flower petals:
- Dried flowers: Any kind of flower is suitable. For example, you can use roses, carnations or lilies, which are popular sympathy and funeral flowers. You could also incorporate your loved one’s favourite flower. (For example, if your Nana loved pink roses, incorporate pink rose petals into the clay.) For our beads made from flowers, we used red carnation petals.
- Sculpey Polymer Clay: Sculpey Polymer Clay can be purchased at most craft stores and comes in a large variety of colours. Consider the colour of your dried funeral flowers when selecting clay colours to work with. Dark coloured petals will be more easily seen in a light coloured clay, and vise versa.
- Four thick pieces of wire: You can purchase wire at the hardware store, or cut a wire coat-hanger with a pair of pliers and use the long piece at the bottom of the triangle. The wire should be longer than the length of your baking pan, as the wire will be suspended over the baking pan during the process of baking the funeral flower beads. You should only put a maximum of 15 beads on 1 piece of wire in order to prevent the beads from fusing together while baking.
- Baking pan.
- Sharp knife.
- Ruler.
Instructions on How to Make Beads From Flowers
Step 1: Dry Out Your Flower Petals
You can let sympathy and funeral flowers dry naturally by leaving them in a vase without any water. However, this method may take several weeks, depending on the weather and level of humidity in the air.
If you don’t wish to wait several weeks for your flowers to completely dry, use our ‘Quick Dry’ ‘Method instead.
The first step in the ‘Quick Dry’ ‘Method is to gently pull the petals from the base of the stem. It is fine if they are crushed during the process as the petals, once they are fully dried, will need to be further crushed before they are incorporated into the polymer clay.
Next, preheat the oven at its lowest temperature, which is about 180 degrees Fahrenheit or 82 degrees Celsius in most conventional ovens.
Then line a cookie sheet with parchment paper. Arrange the petals from your sympathy and funeral flowers in a single layer on the parchment paper. If the petals are crowded, they will not fully dry.
Finally, place the cookie sheet with your funeral flower petals into the oven and heat.
Small petals from flowers like carnations will take approximately 7 minutes until they are completely dry, while large petals (e.g. rose petals) will take approximately 15 minutes or longer.
Check the petals regularly to see how they are drying.
You should leave the oven door cracked open so that moisture can escape during the drying process.
Step 2: Form the Beads Made From Flowers
The first thing you need to do is to preheat the oven to the temperature specified on the polymer clay package. Temperatures vary by brand.
Next, crush a handful of dried flower petals into tiny pieces.
Once you are satisfied with the size of your dried flower petals, break off approximately 3 tablespoons of polymer clay. This amount will produce approximately 63 beads with a diameter of 0.5 cm.
(Remember, you need 53 funeral flower beads to make your rosary. Our instructions are for more than you need in case a few of them are misshapen.)
Now get the polymer clay ready to use by working and kneading it in your hands vigorously. (Imagine that you are working with pizza dough.) Once the clay is soft and pliable, you are ready to shape it.
Roll the polymer clay into a long tube with a diameter of approximately 0.5 cm.
Lay the polymer clay tube next to a long ruler and then notch the clay in 1 cm increments. Then cut a 1 cm segment of polymer clay using a sharp knife.
Roll the polymer clay into a ball. Then flatten it out with the palm of your hand. Once the clay resembles a flat and round pizza base, sprinkle a pinch of the dried and crushed funeral flowers evenly over the top.
Once you are satisfied with the amount of dried funeral flowers and the evenness of its distribution over the top of the flat polymer clay, knead the clay in your hands. The goal is to work the dried funeral flowers into the clay.
Once you have the dried petals worked into the clay, shape the clay into a bead. The bead can be a sphere, a cube, a flat disc, tubular, or any other shape that you like.
After you have shaped a bead, check again if you like the amount of dried flower flecks in the clay. If you are unsatisfied, you can add more, but be sure to rework the clay so that the flower petals that you added are fully incorporated into clay before you reshape the bead.
Once you are happy with the shape of your first bead, pierce a hole through the centre of the bead with your wire. Leave the funeral flower bead on the wire (see photograph below):
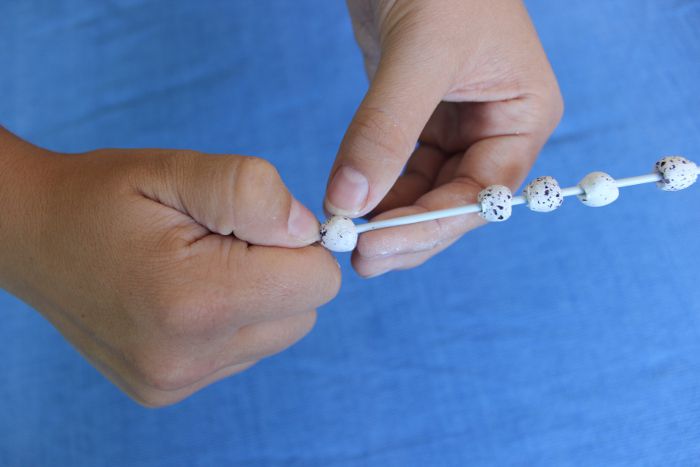
Prop the wire across your baking pan so that your bead is suspended on the wire and not touching the bottom of the pan. Doing this will prevent your bead from forming a flat side during the baking process.
The bead will probably loose some of its shape when you thread it onto the wire, so gently reshape the bead with your fingers. Do not tug on the bead as you are doing this, as you will make the hole in the centre of the bead too large.
Next, form more beads. Besides the shape, you can also experiment with making different sizes of beads.
If you don’t like a bead that you have made, simply rework the polymer clay until you are happy with how it looks. It really is like working with Play-Doh!
After each individual bead is made, feed the bead onto the wire, leaving space between the beads. If you fail to leave space, the funeral flower beads will fuse together during the baking process
Place the baking pan with the suspended funeral flower beads into your preheated oven and set the timer according to the directions given on the polymer clay packaging.
Once the funeral flower beads have been baked, let them cool for about 25 minutes. When the beads and the wire are cold to the touch, carefully remove the beads from the wire.
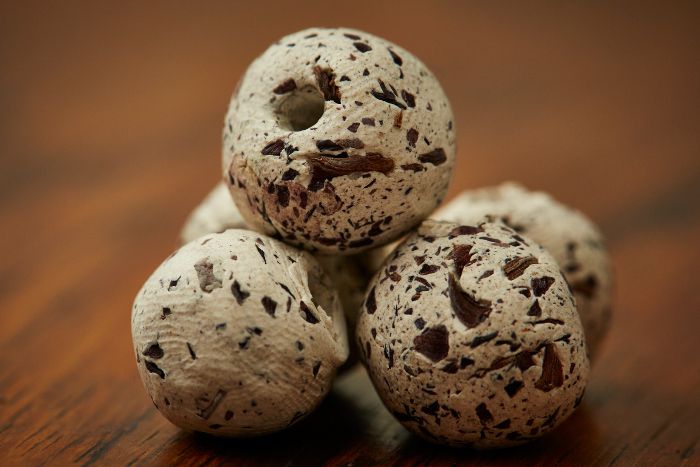
Your baked beads made from flowers should look something like ours:
How to Make a Charm Bracelet
Once you have the beads for your charm bracelet—either homemade beads made from flowers, or store-bought beads—you are ready to start assembling your charm bracelet.
Below is an instructional video that shows you, step-by-step, how to make a charm bracelet. (As always, we also have written instructions detailing the process.)
What You’ll Need to Make a Charm Bracelet
You need only a few materials and tools when making a charm bracelet:
- 14 to 19 beads: How many you need depends on the size of your wrist and the size of the beads.
- Spacer beads: If you are using beads made from flowers, you can use store-bought beads as spacer beads.
- A ruler.
- Flat-nosed pliers.
- Round-nosed pliers.
- Wire cutters.
- Stretchy jewelry cord.
- 1 jump ring.
- 1 bail.
- 1 charm.
- 1 paper clip.
Instructions on How to Make a Charm Bracelet
STEP 1: Calculate How Much Cord You Will Need
Take the stretchy jewelry cord and wrap the cord around your wrist. This is how you measure how big your charm bracelet needs to be. (The charm bracelet in our video is for a 20 cm diameter wrist.)
You then need to add an extra 10cm to whatever number you got when measuring the size of your wrist. (For our charm bracelet, we used a total cord length of 30 cm.)
You want to add this extra 10 cm so that you can easily tie a knot after you have added the beads. It is easier to trim off excess cord than to try and tie a knot with too little cord.
Measure the cord against your ruler and cut it to the desired length using your wire cutters.
Take a paperclip and attach it to one end of the cord. This will stop the beads from sliding off the end of the cord once you start adding them.
STEP 4: Assemble the Beads on the Cord
Start assembling your charm bracelet. Take your beads—either homemade beads made from flowers, or store-bought beads— and begin adding them to the jewelry cord. Use spacer beads throughout the charm bracelet to create an interesting pattern.
Our charm bracelet alternates between using one bead made from flowers and one store-bought spacer bead. However, you can create whatever pattern you like.
Continue adding the beads in the desired pattern until you have about 5 cm of empty cord on either side (which will be needed to tie the knots).
STEP 5: Add the Bail to the End of the Charm Bracelet
Add the bail onto one end of your charm bracelet. It is best to put the bail on the end of the cord (as opposed to the middle) because the bail helps hide the knot that you will be tying in the next step.
After you have added the bail, it is time to make a knot. Hold both ends of the cord so that all the beads fall into the middle of the charm bracelet. (You want about 5 cm of empty cord on both ends.)
Now you simply pull the ends of the cord together and fasten a tight knot. Don’t leave a gap between the beads and the knot. Also make it a double knot to ensure that it holds securely.
Cut off the excess cord just after the knot using your wire cutters.
STEP 7: Attach the Charm to the Bracelet
You are now ready to attach the charm to the bail using a jump ring. This is when you need your round-nosed and flat-nosed pliers.
Pick a size of jump ring that is proportionate to the size of the charm that you have selected. In our case, we used a fairly large charm so we needed to use a large jump ring that could accommodate it.
Using your round-nosed pliers, pull apart the opening of the jump ring just wide enough so that the eyelet of your charm can fit onto it. Then close the jump ring using your flat or round-nosed pliers.
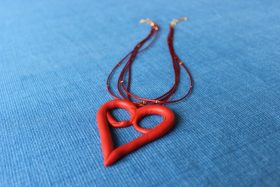
You can use whatever type of charm that reminds you of your loved one. For our charm bracelet, we used a photo locket.

Related Articles


Let Us Know How You Did
We hope that you found our instructions on how to make a charm bracelet helpful. We also hope that you had a go at making your own beads from flowers.
If you found this post helpful, we would appreciate a Like on Facebook.
You are also welcome to share a photograph of your charm bracelet, along with a description of the person that you loved and lost in the comments section below.
We, along with our readers, would love to hear from you.
Don’t forget to follow our Pinterest board for more memorial craft ideas!