
Wondering how to make a funeral wreath with ribbon? Perhaps you’ve lost a loved one recently, or are planning to make a sympathy wreath for a friend…
Look no further.
In this post, you’ll learn step-by-step how to make a funeral wreath with ribbon using fresh flowers. This DIY funeral wreath is sure to be a beautiful addition to any funeral, memorial service, or celebration of life.
Let’s get started…
How to Make a Funeral Wreath With Ribbon: Instructional Video
Do you learn a new skill more easily when you have a chance to watch others perform it? If so, this video is for you!

List of Supplies For DIY Funeral Wreath With Ribbon
Before we get into how to make a funeral wreath, let’s cover the supplies and tools that you’ll need. These items may be purchased at your local craft store or online at Amazon.
- Circular oasis (we used 15″ but you can use whatever size you like.)
- Floral pins
- Scissors
- Flower arranging shears or wire cutters for cutting thick stems (optional)
- Flower food to keep flowers looking fresh for longer (optional)
- Flowers in various sizes. We used:
- Large flowers: red roses and purple chrysanthemums
- Medium-sized flowers: white chrysanthemums
- Small flowers: red ornamental berries
- Greenery. We used:
- leatherleaf fern
- aspidistra leaves
- 3 yards of 1 1/2″ (1.3cm) wired ivory satin ribbon (or whatever coloured ribbon you want for your bow)
- 1 yard narrow satin ribbon in the same colour as your bow (or florist wire or fishing wire)
You don’t have to use the flowers and greenery that we used in our DIY funeral wreath. Use whatever flowers and greenery are available locally or that are appealing to you.
However, we do recommend selecting flowers and greenery in different colours, sizes and textures, so that your funeral wreath has a lot of visual interest.

The Steps For Making a DIY Funeral Wreath With Ribbon
Step 1: Prepare the Circular Oasis
The first step is to thoroughly soak the circular oasis that will form the base of your funeral wreath with water. There are several ways that you can accomplish this.
If you have a large sink, fill it with water. Then flip the oasis upside-down so that the floral foam is facing the water and submerge it for a few seconds.
If your sink isn’t large enough to accommodate the oasis, you could submerge it in a bathtub. You could also soak it outside with a garden hose.
The last way to soak your oasis is to fill a pitcher with water and pour it over the oasis. This is best done over a sink or a bucket to prevent a big mess being made.
IMPORTANT: If you fail to thoroughly wet your oasis, your funeral wreath will not last as long because the flowers rely on the moisture in the foam to survive.

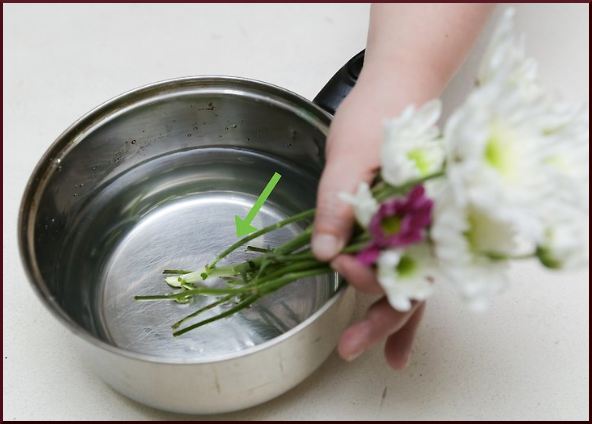
Step 2: Trim Your Funeral Flowers and Greenery
When your oasis is wet, it’s time to prepare the flowers. Disassemble the floral bouquets that you purchased and start cutting the flowers into individual pieces. If you have a pair of good quality scissors, they’ll work fine. Otherwise, use flower arranging shears or wire cutters.
IMPORTANT: Do not cut the stem of the flowers too short — be sure to leave about an inch of stem — otherwise it will be more difficult to secure the flower to the oasis and you’ll have to use more floral pins. You can always further trim the stem as you make the funeral wreath if it proves to be too long.
With flowers, ornamental berries or greenery that grow in clumps, vary how you divide the clump. It looks nice to have some larger clumps of the plant in your funeral wreath, as well as some smaller clumps. (After all, variety is the spice of life!)
Once you have trimmed your flowers, ornamental berries and greenery, organize them into rows because it will make assembling your funeral wreath much faster.

Step 3: Mix a Glass of Flower Food to Keep Your Funeral Wreath Looking It’s Best
If you have flower food, mix it in water. Before you add a flower to your funeral wreath, you’ll dunk its stem into the flower food mixture. This will help your flowers stay fresh for as long as possible!
Step 4: Add the “Hero Flowers” to the Funeral Wreath
Once you’ve prepared your flowers, it is time to addd them to your funeral wreath.
We recommend starting with your largest flowers. We refer to them as the “hero flowers” because they are the focal point of the funeral wreath.
First, take 3 of your hero flowers (e.g. three individual chrysanthemums). Dunk the stems into the flower food mixture. Then pick one point on the oasis and insert all three stems directly into the floral foam to form a group.
(Note on the image below the three white chrysanthemums that are grouped together.)
Then pick another point on the oasis and again insert 3 hero flowers as a group. (Don’t forget to dunk the stems in plant food each time!)
Keep repeating the process until you have several groups of hero flowers all around the funeral wreath. It looks best if the groups of hero flowers are of equal distance apart.


Related Articles


~
Step 5: Add Medium-Sized and Small Flowers to the Funeral Wreath
Now that you’ve anchored your funeral wreath with your hero flowers, it’s time to build-off your hero flowers and add smaller flowers around them. (Again, don’t forget to use the plant food.)
It looks really nice if you try to use the same combination of flowers and colours when building-off each hero flower. Doing this will give your DIY funeral wreath a sense of cohesion and a “professional” look.
PRO TIP: When you’re building off your hero flowers, try to insert the smaller flowers in at a angle so that it looks like they are nestled into the large flower (like a bouquet).
If you’re having trouble securing flowers to your wet floral foam base, use floral pins to secure your flowers to the oasis.

Step 6: Fill in the Gaps With Greenery
Now for the last step in how to make a funeral wreath — filling in the gaps between the flowers with plenty of greenery!
You’ll also want to use the plant food for this step, even though greenery tends to be hardier than fresh flowers. You’ll also likely need to use floral pins to ensure that your greenery is properly secured.
After you have filled in the gaps around the flowers, cover the inner and outer rims of your oasis with greenery as well because these areas will also be visible when the funeral wreath is set on an easel at the service or laid against a gravestone.
In our DIY funeral wreath, we overlapped the aspidistra leaves like singles on a roof. The end effect was very neat and tidy.
IMPORTANT: When adding greenery to your funeral wreath, be sure to leave a small area empty so that you have adequate space to attach your ribbon and stack bow. You can always add more greenery later if there is residual space after the bow is in place.

How to Make a Funeral Ribbon With Stacked Bow
It’s now time to make a funeral ribbon with a voluminous stacked bow to complete the look of your funeral wreath (as can be seen in the image below).
Here you’ll need 3 yards of 1 1/2″ (1.3cm) wired satin ribbon in white, (or whatever colour you want), along with 1 yard narrow satin ribbon in the same colour.

Using the wide ribbon, begin by making two loops to establish the width of your bow. Make two more loops of roughly the same size.
With a generous length of narrow ribbon, tie off the centre of your bow tightly. (Do not trim the excess off the narrow ribbon just yet.)
Cut the tails of your bow to the desired length. You now have the bottom layer of your bow.
Now, make a second four-looped bow, (but this time, make the loops slightly smaller than the first one). This will form the top layer of your bow.
Once you have formed the top layer, (with slightly smaller loops), tie this layer to the first layer with the narrow ribbon in place. (This is why we didn’t want you to trim the excess.) Try and keep the knot on the back of your bow.
Once the two layers of ribbon are attached together, you can trim off any excess off the narrow ribbon.)
Once you’ve completed your funeral ribbon with a stacked bow, you simply attach it to your funeral wreath by wrapping florist or fishing wire (or your excess ribbon) through the bow and then around the base of the oasis. Double knot it so that it is secure.
And there you have it — a gorgeous DIY funeral wreath using fresh flowers. Whether you intend to use your funeral wreath at a church or graveside service, or give it as a sympathy wreath to a grieving friend, it is sure to bring a measure of comfort.

Additional Resources
Did you know that Love Lives On has a comprehensive library of articles on funeral planning, grieving, and celebrating your loved one’s life in unique ways?
Here are some other popular posts on our website:
- 3 unique DIY commemorative crafts for kids
- How to make a beautiful bracelet out of funeral flower beads
- 100+ celebration of life ideas
- Ultimate collection of sad songs for when you need a good cry
- How to make your own DIY keepsake wreath
It Helps to Share…
If you found our post with steps for how to make a funeral wreath and how to make a funeral ribbon helpful, we’d appreciate a “Like” on Facebook.
You can also check us out on YouTube and on Pinterest where we share more inspiring ideas to help you celebrate his or her wonderful life and legacy.
Did you try making this DIY funeral wreath? Use the comment box below and let us know how it went. At Love Lives On, we’re always listening.